DMARC Deployment Guide: 6 easy steps

DMARC Deployment is very critical to prevent ever-evolving internet and its drastically increased usage since the onset of the pandemic have increased the landscape for hackers, impersonators, and threat actors to get into the organization domains. As threat actors are learning new and sophisticated ways to attack, so are we to provide a shield with DMARC deployment.
Table of contents
One small hack can drastically put a question mark on the very reputation and credibility of your brand. The goal of DMARC is to build a system of senders and receivers that will mutually collaborate to improve the authentication practices of the senders and enable receivers to reject illegitimate messages.

Why does BETTER email authentication start with DMARC deployment?
‘42% of customers are less likely to engage with a brand after being phished by an attacker posing as that organization.’
DMARC can give your brand a considerable level of immunity from these malicious indictments explaining why you need to deploy DMARC today!
- Better Security – With DMARC you can protect your customers from spam, fraud, spoofing and phishing by simply blocking unauthorized access to your domain.
- Improved Visibility – You can easily get comprehensive information about who (and/or what) across the vast internet is sending an email using your domain.
- Brand Protection – You protect your customers and they will do everything to protect your brand. It’s always better to have the best defence in place to protect yourself from identity theft and targeted attacks.
There are more reasons to Why to use DMARC ?
How to implement DMARC ?
Wondering how to deploy DMARC easily? Sit back and let’s begin.
Step 1: Understand Your Email Landscape
Inventory Your Domains
First, make a comprehensive list of all the domains that your organization owns—even those not actively sending emails. This ensures that attackers can’t exploit your unused domains.
Analyze Sending Sources
Identify all the systems and vendors that send emails on behalf of your domain. These could include your internal mail servers, CRM software, marketing platforms, etc.
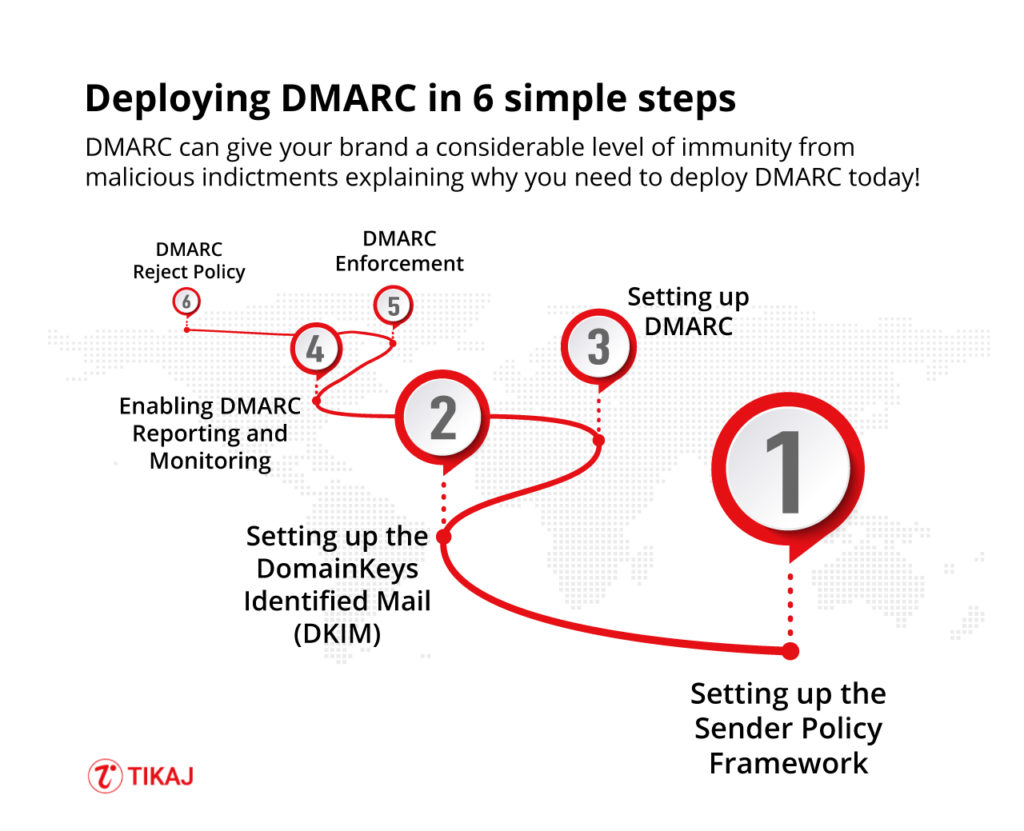
Step 2: Setting up the Sender Policy Framework
You can read What is SPF ? before getting started to get deeper understanding. Usually people merge dkim and spf, though they are interconnected in DMARC Journey but understanding them is critical for getting deeper understand of authentication reporting conformance.
- Gather all the IP Addresses that are used to send email from your domain including Web Servers, In-office mail servers, ISP’s mail server, Any third-party mail servers.
- Make a list of both your sending and non-sending IP Addresses.
- Create an SPF record in .txt for each domain using a text-editing program (i.e. Notepad, Vim, Nano etc)
- Publish your SPF records to DNS or ask the administrator to add them if you aren’t managing your DNS
- Once the record is added to DNS, check it using an SPF Check tool.
Step 3: Setting up the DomainKeys Identified Mail (DKIM)
- Choose a DKIM selector, it should be a simple user-defined text string that will be appended to the domain name to help identify the DKIM public key.
- Generate a public-private key pair for your domain. For instance, Windows end-users can use PUTTYGEN, Linux and Mac end-users can use ssh-keygen
- Create a new record through your DNS management console using the public key from the above pair and publish the new txt record.
Step 4: Setting up DMARC
- Ensure you’ve correctly set up the SPF and DKIM
- Create a DNS record, the txt DMARC record should be named similar to “_dmarc.your_domain com. ” If you manage the DNS of your domain, create a “p=none” (monitoring mode) DMARC record in the same manner as the SPF and DKIM records.
- Test your DMARC record through a DMARC check tool.
Step 5: Enabling DMARC Reporting and Monitoring
DMARC gives you domain reputation understanding at very high level.
- The report is an XML file that includes, count of messages from each IP, what steps were taken per the DMARC policy, SPF results of these messages, DKIM results of these messages.
- The report shows domain owners how many fraudulent messages are using their domain, where they are coming from. Whether they would be stopped by “quarantine” or “reject” policy.
Step 6: DMARC Enforcement
- It might take your organization to be in monitoring mode for a long time before moving to the “quarantine” zone. But once you are confident that your inventory has authorised senders mapped you can move.
- Log in to your DNS server and search for the DMARC record.
- Open the record for the specified domains and update policy from “p=none” to “p=quarantine”
- Add the flag “pct” (percentage of messages subject to filter)
- Once you have reached 100% filtering, you’re ready to move “p=reject” to the HIGHEST level of enforcement level.
Ongoing – DMARC Reject Policy
- Open the DMARC record through your DNS console.
- Change “p=quarantine” to “p=reject”
- Save the record
Bonus tip: It’s especially important to continue to monitor at this stage to ensure that legitimate emails are not being rejected and deleted.
DMARC Deployment Checklist and Plan
To guide you through the critical steps required for implementing DMARC security within your organization we have created DMARC Deployment Checklist and Plan. Excel sheet provides a comprehensive checklist that allows managers to oversee tasks, timelines, and responsibilities. The sheet also includes a planning section for strategic follow-ups and future policy shifts.
Download Free DMARC Checklist and Plan
By leveraging this unified resource, you can streamline the deployment process and enhance your organization’s email security posture.
Remember these as you sit to blast off your email authentication journey!
- Document a deployment policy that you can share with the stakeholders.
- Reach out to a DMARC support provider if DMARC tasks are too overwhelming.
- Communicate new findings from the DMARC report as soon as possible.
- Update your SPF record with newly discovered legitimate senders.
- The percentage of the “pct” flagging should increase gradually.
- In the reject policy, all emails that fail the DMARC check will be blocked/deleted and the email server will never get to know about it, so be sound when to you apply reject.
Read more on how to Increase security for forged spam with DMARC https://support.google.com/a/answer/2466563?hl=en
FAQ’s
How do you deploy DMARC?
You can use a consulting service or do it manually which requires deeper understanding. Deployment is not a one step process and can hinder you day to day service
What is DMARC and how it works?
You can refer to our detailed guide on What is DMARC and How it works ?
What does DMARC stand for?
Domain-based Message Authentication, Reporting, and Conformance
What are the 3 policies of DMARC?
1. None (p=none): Under this policy, the domain owner requests no specific action be taken against emails that fail the DMARC checks. Instead, the domain owner will only receive reports about the failure. This is often used during the initial phase of DMARC implementation for monitoring and data collection.
2. Quarantine (p=quarantine): In this case, the domain owner asks the receiving server to quarantine emails that fail the DMARC checks. Typically, these emails end up in the recipient’s spam or junk folder. This allows the domain owner to test the impact of moving to a more restrictive DMARC policy without rejecting legitimate emails.
3. Reject (p=reject): This is the strictest DMARC policy. The domain owner instructs the receiving server to reject all emails that fail DMARC checks. This means the email will not be delivered to the recipient’s inbox or even their spam folder. This policy is generally recommended only after monitoring and making sure that all legitimate emails will pass DMARC checks.


